Manual Installation
Sign up
If you don’t already have one, visit the Strapi Page Builder sign-up page to sign up for a free development account and get your API key; it will be needed in the next steps.
Strapi
Install the Strapi Page Builder plugin for strapi
From the terminal within your Strapi project, run
npm install @wecre8websites/strapi-page-builderOnce installed rebuild and run your environment with
npm run build && npm run developConfigure Content-Types
- Create or update a content-type in the Content-Type Builder . For this example, the content-type should be configured with a few simple fields like
titleandcontentand, most important, aRelationfield connected toTemplatefrompage-builder. - Create a new content entry in the Content Manager filling out the fields however you like but leaving the template field blank for now.
- Enter your Strapi Page Builder API key and the web app editor url in the Strapi Page Builder settings . Note, if on a free plan, only localhost and 127.0.0.1 domains can be used.
- Set the default content type to to the one configured above and select the new content entry made above. This is the content that will load when Strapi Page Builder first starts. It’s recommended you set this to your index page content.
React
Install the Strapi Page Builder React library
From the terminal within your React project, run
npm install @wecre8websites/strapi-page-builder-reactConfigure an environment variable called PAGE_BUILDER_API_KEY or similar and assign to it your Strapi Page Builder API key.
IMPORTANT: API keys must be handled securely as though they were passwords. You should never commit your API key to GitHub or any where else that it may become compromised.
Create a basic Strapi Page Builder config
Create a new file called config.ts in a folder called blocks in your src directory and the following code:
import { Config } from "@wecre8websites/strapi-page-builder-react";

interface Blocks {
  TextComponent: { text: string },
}

export const config: Config<Blocks, {}, "basic" | "other"> = {
  components: {
    TextComponent: {
      fields: {
        text: { type: "text" },
      },
      defaultProps: {
        text: "Visually editable text",
      },
      render: (data) => <div style={{ padding:"6rem" }}>{ data.text }</div>
    },
  },
  root: {}
}
Create an editor route
If using Next.js, create a new folder called editor in your app directory and add the following code. Adapt as necessary if using a different framework.
import { Editor } from "@wecre8websites/strapi-page-builder-react";
import "@wecre8websites/strapi-page-builder-react/editor.css"
import { notFound } from "next/navigation";
import config from "../../blocks/config";

export default async function EditorPage({
  searchParams,
}: {
  searchParams: Promise<{ _pagebuilderToken?: string }>;
}) {
  const { _pagebuilderToken } = await searchParams;
  if (!_pagebuilderToken) return notFound();
  return (
    <Editor
      config={config}
      apiKey={process.env.PAGE_BUILDER_API_KEY as string}
      strapi={{
        url: process.env.STRAPI_URL as string,
        authToken: process.env.STRAPI_API_TOKEN as string,
        imageUrl: process.env.STRAPI_IMAGE_URL as string,
      }}
    />
  );
}
Add the render component
This example uses Next.js and assumes the Content-Type created in Strapi is called Homepage and is a Single type. Adapt as necessary for your configuration.
import { Render } from "@wecre8websites/strapi-page-builder-react";
import { notFound } from "next/navigation";
import config from "../../blocks/config";

export const revalidate = 60;

const getHomepage = async (locale?: string) => {
  const queryUrl = new URL("http://localhost:1337/api/homepage");
  if (locale) queryUrl.searchParams.append("locale", locale);
  queryUrl.searchParams.append("populate", "*");
  const res = await fetch(queryUrl.toString(), {
    headers: {
      Authorization: `Bearer ${process.env.STRAPI_ADMIN_TOKEN}`,
    },
  });
  const { data } = await res.json();
  const { template, ...content } = data;
  return { template, ...content };
};

export default async function Page({
  params,
}: {
  params: Promise<{ locale: string; slug: string[] }>;
}) {
  const { locale } = await params;
  const { content, template } = await getHomepage(locale);

  if (!template.json || !content) return notFound();
  return (
    <Render config={config} data={{ templateJson: template.json, content }} />
  );
}
Start editing
With both Strapi and Next.js running, open Strapi Page Builder from the Strapi side-bar and start editing your content, visually.
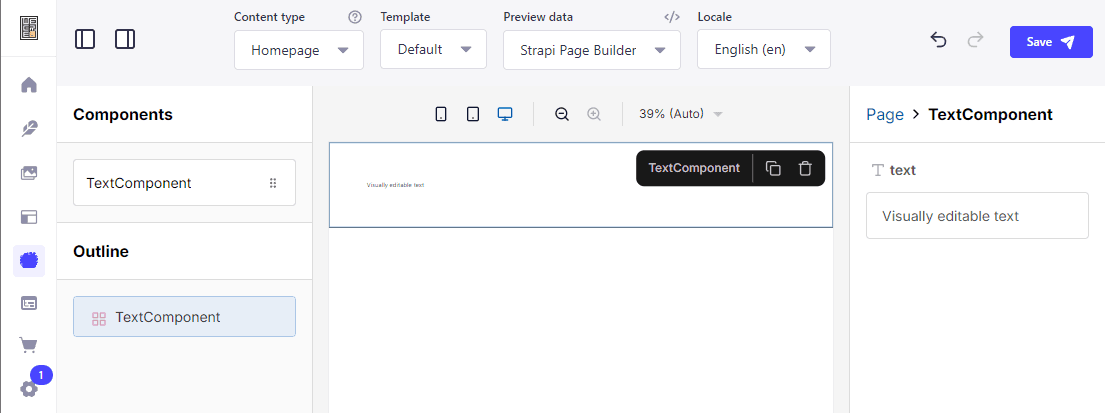
You can now start adding custom components to your project.